Sunday, 25 May 2008
Friday, 23 May 2008
THE BARRIER IN THE BRAIN
Ohhhh look! Nice, cool it moves like water...
Ok - maybe fast water but I wanted only to export 15f for testing reasons. I like the effect - it's booked for the film ;)
Thursday, 22 May 2008
scene02/shot01 - update
 It's a bit later and I am a bit more tired but also wiser...
Now I am nearly happy with the Background... I hope I dont need to pan around because the shot is built up in layers and is not a real 3d space but only textured spheres, some rough geometry in the background and some good geometry on the rock in the foreground ;-)
Sleepytime...
Wednesday, 21 May 2008
First BG Shot ever - scene02/shot01
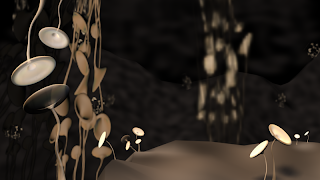 Yupphhhhhiiiiii - here is the first shot for a background. Its atually the establishing shot at the beginning of the film where the camera enters the head and ends in the brain.
The cat is gonna jump in to the frame soon but not here 'cause its only an Image and not a film... hahaha...
But seriously - there are still a few problems with this shot.
1. Glow with Vpost does work on planes with alphamaps on it BUT if there is something behind the plain it also gets the glow (;-) ...get the glow in the flow, man... shut up... strange voice in my head! I have to work!)
2. In the left side of the frame are some overlapping planes also with alpha channels on them. First they rendered well but then in my infinite curiosity I did something and now the most forward plane is the brighest while the planes more in the back are darker.
3. The edge of the rock in the forground is very sharp 3d programm sharp - that's bad
... there are still more problems but at the moment ai cunnot rimemberrrr itshhh tooo baddd ahir quwallity in 105...
Tuesday, 20 May 2008
BUZZCAT - textured
 Here is the cat...
I think I should add some more "features" to the texture to make the cat look more interesting as it is now.
At least the tail tip, the paws and the inner ear needs some more work from me... but NOT tomorrow!
I like the matt felty look of the violett skin right now. If it would be ultramarine blue I would say the cat is a new Ives Klein work - hahaha! But it needs to be violett as it is a colour representing somehow creativity to me...
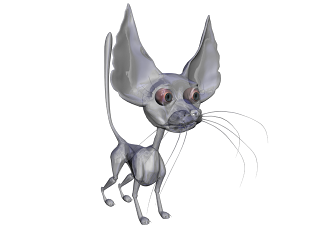 ... and then I spent some time playing around to achieve the transparent look I wanted. But yeah, it reaches to 90% what I had in my imagination - thats Ok, I can live with it.
Cats that sit in a glass houses shouldn't throw stones... but cats that are a kind of glass house... ähm ohm... what the hell do I know what they should do? I don't live in my brain!
I definitively can say, that I prefer Rigging to texturing. Texturing is stupid, boring and not very sadisfying...
SILLY BILLY - Textured
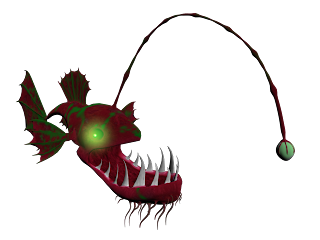 Ufffffhhhhh... its done!
Silly Billy has all the textures on it and I even got his eyes glowing as I wanted and without rendere intensiv attenuated lights in his eyballs but symply the 3dMax VideoPost function (thx Andy)
...oh, but I see right now that I forgot the lantern tip... bah... Tomorrow is unfortunately Background Day - so I don't work on the characters...
doesn't work...
hm... basically my plan was to upload a lot of pictures from my weekends work on the Backgrounds but somehoe it doesn't work...
I'll try it again later
I'll try it again later
Environement - concept scetches
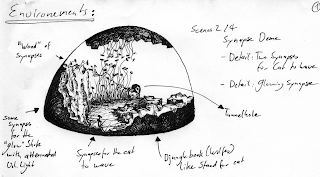 It's better to think first then to go directly in to 3dMax and start to model an environement...
As I get lost in very time consuming work while sitting in front of the Computer I thought it might really be better to take my beloved fineliners and scetch a bit around to save a lot of work and time afterwards.
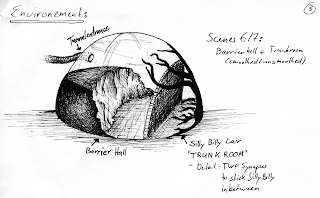 The rough idea of how the setting should look was already in my head but the challenge was to translate it in to a quite small 3d environement that can be used for the shooting with the character models.
Sunday, 18 May 2008
Backgrounds ;-)
Today I looked after a long time again at the script.
The character development and all the technical stuff that comes with it in 3dMax to make them work is finished, so I can design the backgrounds for the characters to act in.
Basically they are already a kind of designed. When I wrote the script I had some sceneries in front of my inner eye. But now is the time to get hold of them in a more realistic way what means I draw a bunch of pictures along the storyline, a kind of storyboard. I drew the hole day till now and only one scene is missing... so I'll draw it tomorrow because the quality of the images gets worse with every hour that passes and every pint more in my belly... hahaha... and I destroied one of my fineliners while drawing so I switched to a wet medium for the backgrounds just to find out that it is much faster and gives much more depth to the image... Gee! Just great...
I'll post some of the stuff (or maybe all of it?) when I am back in Weaverly Building and have a scanner ;-)
Friday, 16 May 2008
Isamu Noguchi
 After posting its much about 3d and my project its time to write about something more personal.
This week I saw a photo of the sculpture "the rape of the sabine woman" from Giambologna on Andies desk as I was bothering him again with my questions *g* So the idea arose in my mind to post something about one of my favored sculptors.
Some of you may know that my history is not very easy to explain... one of its parts include a stay in southern France where I studied/worked in an artists atelier tht was next to a potters workshop. So what I basically did there was painting, scultping clay and drinking wine with the people in this backyard with the workshop.
I refuse to become a 100% PC Nerd. I need both worlds, the CGI and the physical one. I wouln't be able to learn Max as fast as I do without my knowlege in painting (OK, I draw better then I paint...) and sculpting. Maybe it's a once again a yin & yang thing... keep the balance and it will be good and I will be happy. But anyways...
I wanted to say something about ISAMU NOGUCHI. He was an america/japanese sculptur and a friend of the great furniture designer charles Eamus and Buckminster Fuller aka Bucky. I like his minimalistic stile, his reduction and the work on the surface. Sometimes a stone gets through the work on it several different textures what is really great and enriches the perception of it. What I also like a lot on his approach is that he often takes his inspiration out of natural, round forms (his art was called by some people as Biomorphism). For example he made one sculture that looks to me like a piece of a cut branch with all his sidebranches cut away. He reached this effect by making the mayor part of the cylindrical stone piece quite rough and sculpted in some very polished oval shapes in. - just great.
The sculptur I choose as picture is called Heimar and ia located in Jerusalem's jewish museum. Its one of his later (1968) very abstract works so I don't want to look for any resemblance to existing shapes in the nature or the human creations. Once again, I just like the texture and the volume of his work!
Assemblies
Assemblies are useful for creating combinations of geometry and light objects that act as lighting fixtures.
You use them to represent the housing of a lamp and its light source or sources. You can use assemblies to represent lighting fixtures such as simple desk lamps, lighting strips, track systems, wall sconces with fluorescent or incandescent lights, chandelier systems, line voltage cable systems, and so on.
When you create light assemblies, first you create your objects and build a hierarchy, then set joint parameters and assign inverse kinematics (IK) . As a final step, you assemble the object hierarchy. The lights you use in the assembly have light-multiplier and filter color controls. You wire the Dimmer and Filter Color parameters of the Luminaire helper object to the parameters of the light sources that are members of the light assembly.
In order to wire the Luminaire controls to the light parameters, you must first open the assembly. Then, after wiring, you close it.
Thursday, 15 May 2008
tunnel scene - a test
I spent the whole day making tests for the pursiut of the two characters in the tunnel... but obviously too much motion blur... The textures are also not the final ones. I just took the texture from the synapses and copied it to the tunnel...
Synapses - a render time test
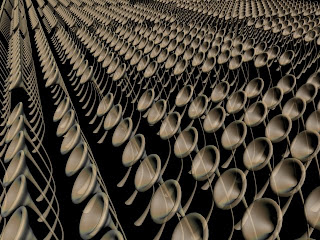 Modeling:
Very basic, bacause its a background item. So Its a hexagon extruded along a spline. The top polies are extruded and scaled manually to get the supper shape.
First I had some problems with smooting because its so low poly modelling. I tried the smooth modifier but somehow it didn't work for me so I found in the poly sub selection group of the object also the smoothing group panel and was able to assign them propperly.
But I found something even better! In the Subdivision Surface Panel in the top- or polyoutroll there is "Use NURMS Subdivision" I set the render iterations to "2" and left the display iterations at "0" for faster display.
To test if the nurms don't take to long to render (as turbosmooth would do) I just made 1000ish copies of the synapse modell, threw a middle complex texture on it (standart OrenNayarBlinn, with falloff to 40 and Index of refraction at 1.3 in the ext. Parameters rollout - all other numbers stay as they are...) and hit the render button.
And it took only 16sec!
HELP! Did I change to a NERD allready or is it normal to think about things like this?
Wednesday, 14 May 2008
UVW - pelt it off the fish
 Here is the unwrapped fish.
As so often the fish was much easier. I should have started with him.
For the end of the lantern I used a circular projected map the rest is again all pelt mapped. It was somehow the easyest to do.
I tried to paint it in the computer room but lately the maschine I'm working on has the tendency to not work propperly after 2pm... I basically wasted nearly two hours by restarting and breaking down again - but hey - I finally finished that SODUKU (or how they are called) it the piece of newspaper that lies in the pile of paper next to my computer...
UVW - pelt it off the cat
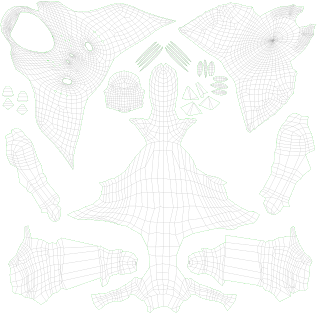
After several atempts with unsatisfying results the UVW Unwrapping for the Buzzcat works.
I did most of the parts with the pelt function in the unwrap UVW Modifier, some pieces with planar mapping out of the same modifier.
The unwrapping now works because I changed the seams of the body and cutted it in to smaller pieces. This would of cours not work if the character had a more complex body texture with strippes or so... But for me it will work and time is going on.
Friday, 9 May 2008
SILLY BILLY - he swims!!
OK, it took a bit of time but the computer was so merciefull to render out my desired jpegs so I could gather them together in AfterEffects. I am quite happy...there are still some problems but you don't see them in this rendering in this movements ;-)
First I wanted to render it with a skylight, because it looks so nice but then I decided to add Omnis without shadows and a Arealight with a 4096 shadowmap to make the shadow on the floor. It looks still petty good... and is fast (8sec per frame)
stupid Computers
Why do they crash when I want to render?
Is it allready to warm for them or do they not like my animation tests?
I don't know...
But if all goes as I want it to(HAHAHA... stopp dreaming, join reality! This will never happen) then I can upload a animated swimming Silly Billy on Youtube this evening. Of course I'm gonna create a link from here to the youtube Video.
It renders now... so I am just bored and to lazy to get up, thats why I write this post. It must be at least 30C in WAV105... but no sun to tain!
Thursday, 8 May 2008
There's a robot beneath the fluff
I found a blog with very cool Images of toy robots.
Ot shows the toys in a whole in one picture and the undeneath robot structure in an other picture. Some of the toys look really sceary without their fluffy Skin...
http://s3.amazonaws.com/s3.mattkirkland.com/ursum.html
Ot shows the toys in a whole in one picture and the undeneath robot structure in an other picture. Some of the toys look really sceary without their fluffy Skin...
http://s3.amazonaws.com/s3.mattkirkland.com/ursum.html
Wednesday, 7 May 2008
ILLUSTRATION - WHAT WRE YOU WAITING FOR
 Once again a new Illustration... I wasn't in a colourfull mood so its all BW.
The picture is an interpretation of the copper engraving like technique of Edward Gorey or Gustave Doré.
OK I have to admit they are much more detailed then my little finliner scetches but my research goes more in the direction of how to create with a few lines a wall structure or the illusion of space
When I draw or paint my subjects are mainly surreal or odd stills. In the first place the seem meaningless but on a second view they enforce to think what could be ment and in a third step they are very profound (or meaningless HAHAHA)
CUSTOM ATTRIBUTES - Morph Targets
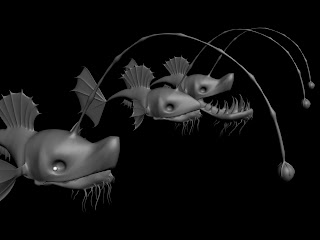 The biggest discovery today was connected to custom Attributes. They are really custom...
Just for fun I tried to wire a morph target to a slider in the Attribute Holder of a controller and to my big suprise it worked!
I was jumping around in pleasure - imagine the clicks you save by this!
The skin stays frozen all the time because access to the morpher is no longer required as all his targets are now wired to custom attributes in p.e. the master body controller.
Happy happy fröi fröi :-)))))))
Tuesday, 6 May 2008
SILLY BILLY - ENVELOPES
 The Rig for the fish was surpisingly easy to do compared with the cat. No legs,no shoulder, no other funny stuff just a head with some fins and tailish things.
It took only a day for all the bones, IKs, helper objects control shapes and the parameter wiring - hahahappy!
OK, it needs still some work on the envelopes but hey I am not a wizzard or something like this and I need to sleep, to eat and sometimes my body should move its muscles to not loose all abilities of movement.
But sooner or later I will create my own 3d body in 3dMax or Maya - the GOD edition of course - then I'll load my mind in to the new body and done. HAHAHA - I already mentioned that I gradually develop a nice little lunacy - Oh I like it very much!!! The world is great yeahhh! Screeny screeny boom boom ;-)
Saturday, 3 May 2008
SILLY BILLY RIG
Illustration RockSoc Assault
 During the last Assault from RockSoc in the GLO I began to duddle aome of the dancing people. I totally forgot about this till I looked through my scetchbook today and discovered some hieroglyphic unreadable drawings. But not all of them were rubbish so I decided to take one in to "post" in Photoshop ;-)
It might be one of the girls dancing but maybe I just invented the character - never drink and draw... or was it "never drink and drive"? Who knows ;-)
Friday, 2 May 2008
The Cat moves!!!
The cat moves and can express some stuff... Ok, I found still some mistakes, but the weekend is coming so I can do all the stuff. I hope it's going to rain so its easier to stay at home in front of the Laptop...
I am a bit behind my personal project schedule because of the rigging. It took slightly longer then expected (2weeks more) but is now OK.
The fish is easy - he has no legs, no neck and is basically a head with a tail...
During rigging the cat I felt more and more how I begin to understand the whole bone and IK wizardry. In the end I changed the morph targets for the whyskers to two bone chains with HI IK Solvers on them and a Dummy as a controller. The benefit of this is, the file size decreases and the whyskers are easier to controll but on the other hand I spent an other evening with bones and envelopes.
Thats it... in a few hours I'm going to shoot the live footage for the beginning and the end of the animation that is obviously not animated.
Subscribe to:
Comments (Atom)
